
Flutter SDK
Welcome to our Flutter plugin designed to seamlessly integrate with the Bureau's Device Intelligence, enhancing the functionality of mobile apps or webpages.
Minimum Requirements
- SDK Minimum Version 21
- Kotlin Minimum Version: 1.6.21
- Java Minimum Version: 8
- iOS Minimum Version: 13
- AndroidX
Android Changes
- The XML below is a representation of the permissions required. Please refer to the table below.
  <uses-permission android:name="android.permission.ACCESS_NETWORK_STATE" />
  <uses-permission android:name="android.permission.USE_BIOMETRIC" />
  <uses-permission android:name="com.google.android.providers.gsf.permission.READ_GSERVICES" />
  <uses-permission android:name="android.permission.ACCESS_FINE_LOCATION" /> //OPTIONAL
  <uses-permission android:name="android.permission.ACCESS_COARSE_LOCATION" />
  <uses-permission android:name="android.permission.ACCESS_WIFI_STATE" />
  <uses-permission android:name="android.permission.ACCESS_NETWORK_STATE" />
  <uses-feature android:name="android.hardware.location.gps" />
  <uses-feature android:name="android.hardware.location" />
| PERMISSION | USAGE STATUS |
|---|---|
| USE_BIOMETRIC | REQUIRED |
| READ_GSERVICES | REQUIRED |
| ACCESS_WIFI_STATE | REQUIRED |
| ACCESS_NETWORK_STATE | REQUIRED |
| ACCESS_COARSE_LOCATION | REQUIRED |
| ACCESS_FINE_LOCATION | OPTIONAL |
iOS Changes
Make the below changes to Info.plist
//App would like to access IDFA for tracking purpose
<key>NSUserTrackingUsageDescription</key>
<string></string>
POD File Changes
//Add below lines to end of your pod file.
post_install do |installer|
  installer.pods_project.targets.each do |target|
    target.build_configurations.each do |config|
      if target.name == "Sentry" || target.name == "SwiftProtobuf" then
        config.build_settings["BUILD_LIBRARY_FOR_DISTRIBUTION"] = 'YES'
      end
    end
  end
end
Integration Steps
At its core, the solution functions through three straightforward steps:
- Start by installing Device Intelligence SDK with mobile application.
- Initialize the SDK - this enables us to gather user and device data. We will then thoroughly analyze and enhance the collected data in the background.
- You can then utilize our API to access insights, aiding you in deciding the subsequent actions for your user, whether it's permitting, obstructing, or redirecting them.
Flow Diagram
This diagram shows the interactions between a merchant's mobile app and Bureau's SDK.
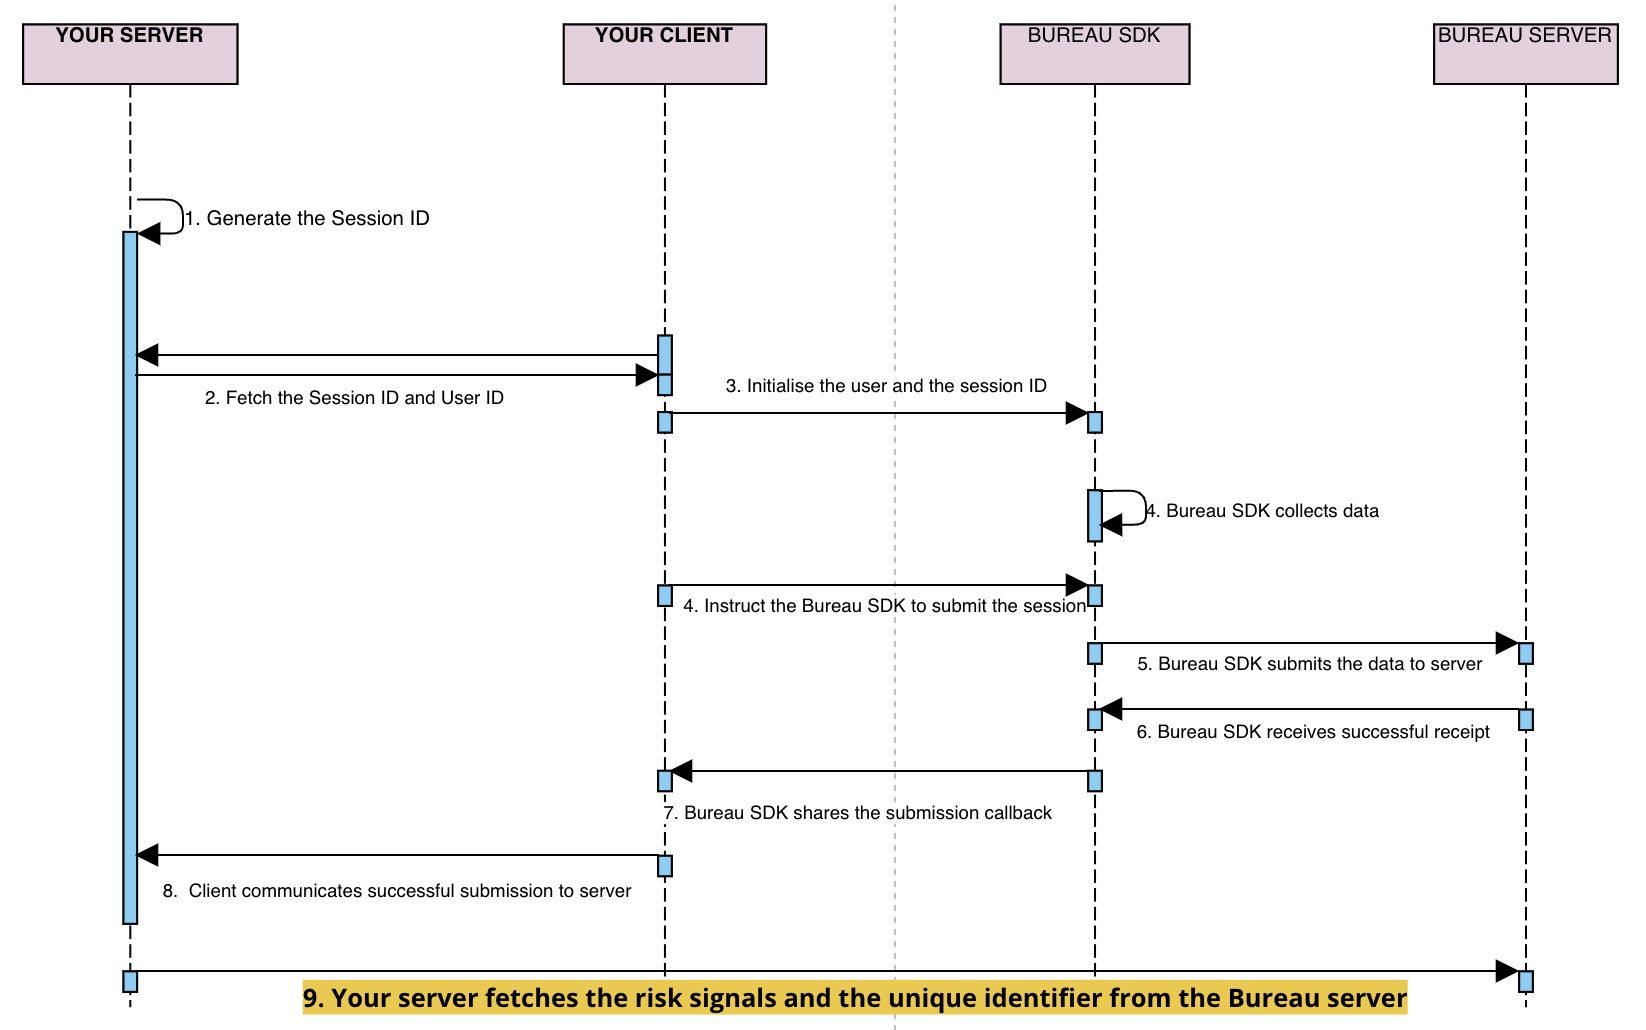
sessionKeyanduseridare generated / retrieved by the client backend and sent to your application- Your mobile application initialises our SDK through the
initfunction by setting these attributes -- Session ID (mandatory unique UUID)
- User ID (optional)
- Flow (optional)
- Invoke the
submitfunction in SDK to pass the data to Bureau backend. - Upon successful submission of the parameters, a
callbackis received in the SDK. The next steps can be taken based on thecallback(success/failure). - If the callback is successful, your mobile application relays the
successto your backend - Invoke Bureau's backend API
/v1/suppliers/device-fingerprintto fetch insights- Input :
sessionId
- Input :
- Based on the insights provided (fingerprint, and risk signals), you can determine the next steps for the user, such as allowing, blocking, or redirecting them.
Step 1 - SDK Installation
Version Recommendation Install onetaplogin: 1.3.8 Use this version if you DO NOT want to collect package names via "QUERY_ALL_PACKAGES" for fraud signal detection.
Step 2 - Initialise SDK
On Production
// Import package
import 'package:onetaplogin/onetaplogin.dart';


// To use Device Intelligence
String status = await Onetaplogin.submitDeviceIntelligence(         //Here the status returned is a string and contains the finger print sdk's success or failure message
          clientID,
          sessionId,
          userId);
On Sandbox
// Import package
import 'package:onetaplogin/onetaplogin.dart';

String status = await Onetaplogin.submitDeviceIntelligence(                       //Here the status returned is a string and contains the finger print sdk's success or failure message
          clientID,
          sessionId,
          userId, env : "Sandbox");
The status object for submitDeviceIntelligence and authenticateWithDeviceIntelligence methods would be a Bureau's own custom class that has the following properties.
- isSuccess boolean to check the success of deviceintelligence.
- errorMessage and errorCode to pinpoint errors in the case isSuccess is false and empty for true cases.
Android outer level build.gradle changes
buildscript {
  repositories {
    maven {
      url = uri("https://storage.googleapis.com/r8-releases/raw")
    }
  }
  dependencies {
    classpath("com.android.tools:r8:8.2.24")
  }
}
Android Manifest changes (Only for Device Intelligence)
| PERMISSION | USAGE STATUS |
|---|---|
| USE_BIOMETRIC | REQUIRED |
| READ_GSERVICES | REQUIRED |
| ACCESS_WIFI_STATE | REQUIRED |
| ACCESS_NETWORK_STATE | REQUIRED |
| ACCESS_COARSE_LOCATION | REQUIRED |
| ACCESS_FINE_LOCATION | OPTIONAL |
iOS Changes
Make the below changes to Info.plist
//App would like to access IDFA for tracking purpose
<key>NSUserTrackingUsageDescription</key>
<string></string>
Step 3 - Invoke API for Insights
To access insights from users and devices, including device fingerprint, and risk signals, integrating with Bureau's backend API for Device Intelligence insights.
Sample Request and Response
Below is a sample request and response for our Device Intelligence API. Refer to our Device Intelligence API documentation for more details.
Contact our support team at [email protected] to get your API keys and the production endpoint for the API.
curl --location --request POST 'https://api.sandbox.bureau.id/v1/suppliers/device-fingerprint' \
--header 'Authorization: Basic MzNiNxxxx2ItZGU2M==' \
--header 'Content-Type: application/json' \
--data-raw '{
    "sessionKey": "697bb2d6-1111-1111-1111-548d6a809360"
}'
{
  "GPSLocation": {
    "city": "",
    "country": "",
    "latitude": 0,
    "longitude": 0,
    "region": ""
  },
  "IP": "106.51.82.180",
  "IPLocation": {
    "city": "Bengaluru",
    "country": "India",
    "latitude": 12.976229667663574,
    "longitude": 77.60328674316406,
    "region": "Karnataka"
  },
  "IPSecurity": {
    "VPN": false,
    "isCrawler": false,
    "isProxy": false,
    "isTor": false,
    "threatLevel": "LOW"
  },
  "IPType": "v4",
  "OS": "android",
  "accessibilityEnabled": false,
  "adbEnabled": false,
  "behaviouralRiskLevel": "UNKNOWN",
  "confidenceScore": 100,
  "createdAt": 1712573578096,
  "debuggable": false,
  "developerMode": false,
  "deviceRiskLevel": "MEDIUM",
  "deviceRiskScore": 25.56,
  "emulator": false,
  "factoryResetRisk": "LOW",
  "factoryResetTime": null,
  "fingerprint": "6db7755c-1232-4f9d-ae1e-52bd952fac68",
  "firstSeenDays": 9,
  "googlePlayStoreInstall": true,
  "isAppCloned": true,
  "isAppTampered": null,
  "isDebuggingEnabled": false,
  "isOEMUnlockAllowed": false,
  "isSimPresent": true,
  "merchantId": "org_4KRtr8n6xKTsONjo",
  "mitmAttackDetected": false,
  "mockgps": false,
  "model": "A063",
  "networkInformation": {
    "ipType": "HOME",
    "isp": "Atria Convergence Technologies Pvt. Ltd."
  },
  "package": "id.bureau.sdkdemo",
  "remoteDesktop": false,
  "requestId": "26de630a-c4c2-451f-8718-b7df6a1f786b",
  "riskCauses": [
    "IS_APP_CLONED"
  ],
  "riskLevel": "MEDIUM",
  "riskScore": 25.56,
  "rooted": false,
  "sessionId": "3ad55d53-08be-46d5-8103-a8d0b570d6f5",
  "statusCode": 200,
  "timestamp": 1713427153595,
  "totalUniqueUserId": 5,
  "userId": "dhruvMultiple",
  "voiceCallDetected": false
}
Verifying App Integrity with Signature Hash
Before going live, we need to ensure your app hasn't been tampered with. This helps protect both you and your users.
Here's how you can verify your app's integrity:
Gather Information
- Package Name: This is the unique identifier for your app on the platform (e.g.,
com.yourcompany.myapp). It typically follows a reverse domain name structure, such as:com.<yourcompany>.<appname>com.<yourcompany>.<appname>:<servicename>(if using sub-organizations)
- Signature Hash Code: This code is generated from your app's signing certificate and helps verify its authenticity.
Get the Signature Hash Code
Most development environments provide built-in tools for obtaining the signature hash code. Below is a common way (using the GET_SIGNING_CERTIFICATES permission):
- Access your project's settings in the PackageManager.
- Look for the permission section and ensure you have the
GET_SIGNING_CERTIFICATESpermission enabled. - Once enabled, follow the specific instructions provided by your development environment to retrieve the signature hash code. It's usually found within a property like
signingInfo.signingCertificateHistoryand will be a byte array representation of the hash.
Share the Information
Once you have your package name and signature hash code, please share them with us before launching your app live. This allows us to verify the app's authenticity and protect both you and your users.
Updated 5 days ago