iOS Native SDK
Welcome to our iOS plugin designed to seamlessly integrate with the Bureau's Device Intelligence, enhancing the functionality of mobile apps or webpages.
Getting Started
To integrate our native SDK into your project, follow the comprehensive documentation provided below. Ensure a seamless implementation and unlock the full potential of Device Intelligence for your application.
Minimum Requirements
- Xcode 11.0+
- iOS Deployment Target > 13.0 & Mac OS > 12.0.
| Permission Type | Description |
|---|---|
| Optional | Monitoring the Battery - UIDevice.current.isBatteryMonitoringEnabled // |
| Optional | User Current location - CLLocationManager.locationServicesEnabled() // |
| Required | For Advertising Identifier IDFA - requestTrackingAuthorization |
Integration Steps
At its core, the solution functions through three straightforward steps:
- Start by implementing Device Intelligence + OTL SDK with mobile application.
- Initialize the SDK using either the Client ID or Credential ID. This enables us to gather user and device data. We will then thoroughly analyze and enhance the collected data in the background.
- You can then utilize our API to access insights, aiding you in deciding the subsequent actions for your user, whether it's permitting, obstructing, or redirecting them.
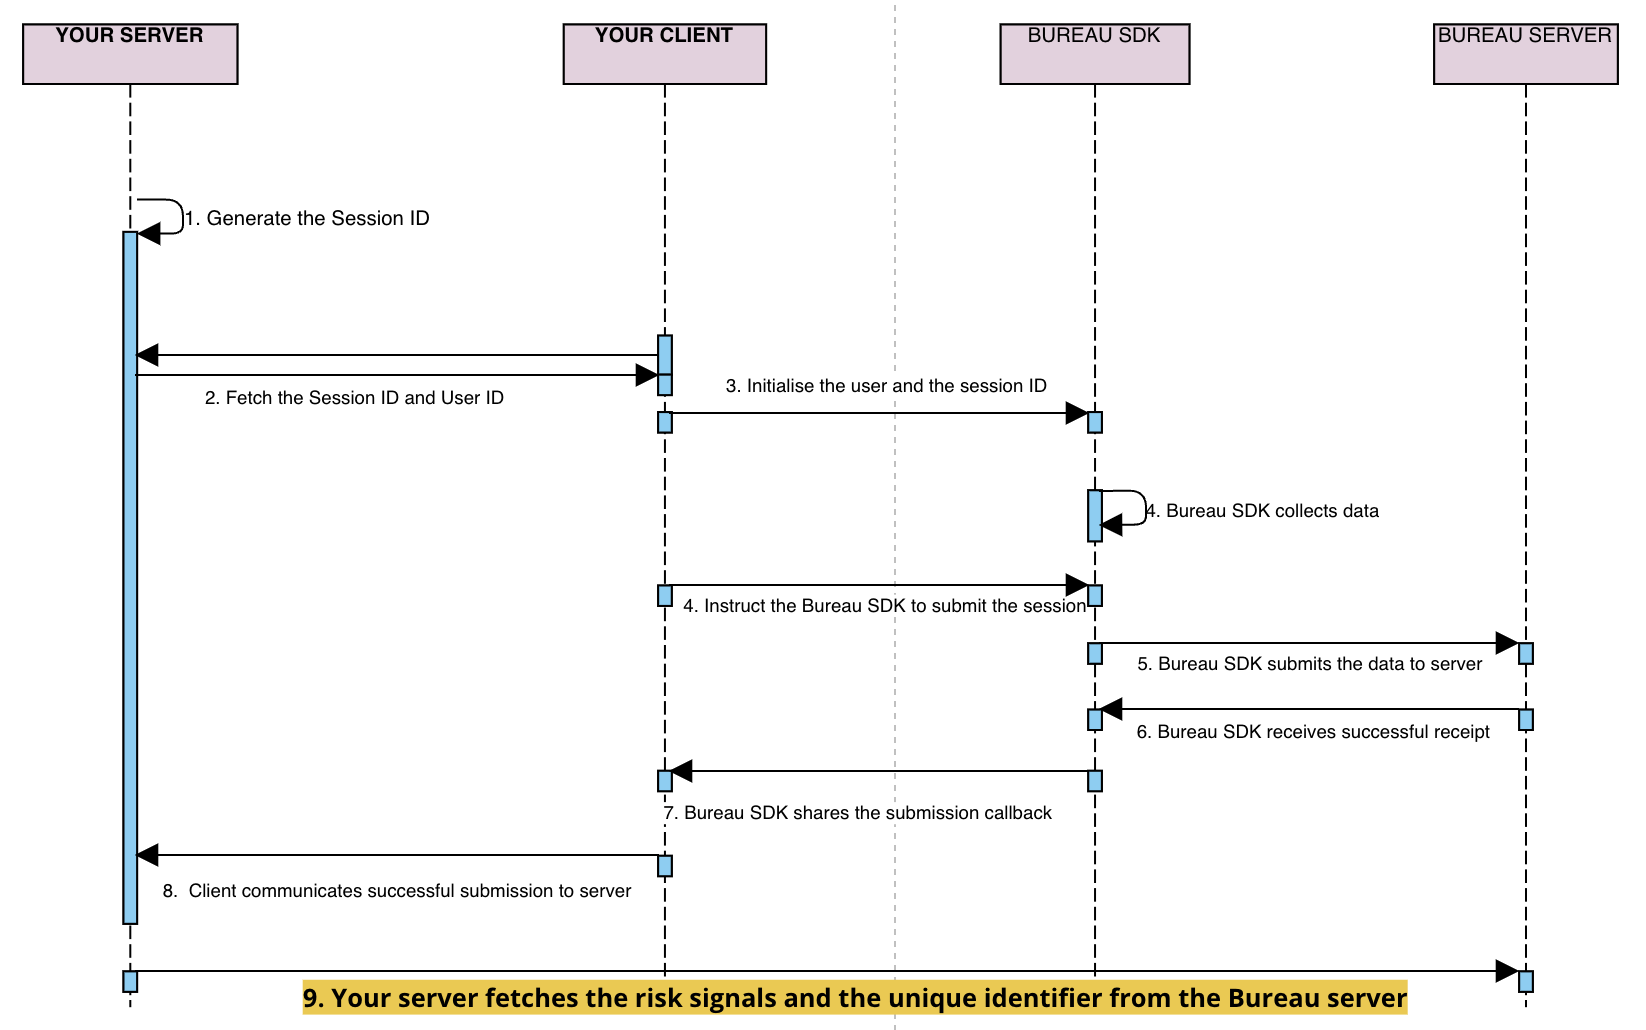
Flow Diagram

sessionKeyanduseridare generated / retrieved by the client backend and sent to your application- Your mobile application initialises our SDK through the
initfunction by setting these attributes -- Session ID (mandatory unique UUID)
- User ID (optional)
- Flow (optional)
- Invoke the
submitfunction in SDK to pass the data to Bureau backend. - Upon successful submission of the parameters, a
callbackis received in the SDK. The next steps can be taken based on thecallback(success/failure). - If the callback is successful, your mobile application relays the
successto your backend - Invoke Bureau's backend API
/v1/suppliers/device-fingerprintto fetch insights- Input :
sessionId
- Input :
- Based on the insights provided (fingerprint, and risk signals), you can determine the next steps for the user, such as allowing, blocking, or redirecting them.
Prerequisite
Enable the WiFi Information
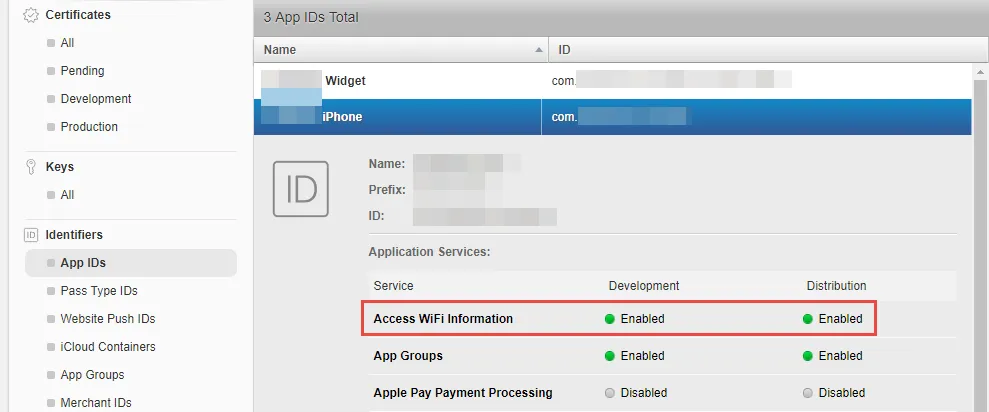
Before integrating our SDK into your application, it’s essential to enable Access to WiFi Entitlements in your Apple Developer Account. This entitlement is necessary for our SDK to retrieve information about the connected WiFi network.
Please follow the steps below to enable Access to WiFi Entitlements.
- Log into your Apple developer account.
- Navigate to the Certificates, Identifiers & Profiles section.
- Select your app and enable the Access WiFi Information entitlement. The Access WiFi Information entitlement is available in the Identifiers section.

- Navigate to Provisioning Profiles and regenerate them, as existing profiles will become invalid after the entitlement change.
- Open Xcode, go to Preferences (⌘ + ,) → Accounts. Select your team and click Download Manual Profiles to fetch the latest profiles.
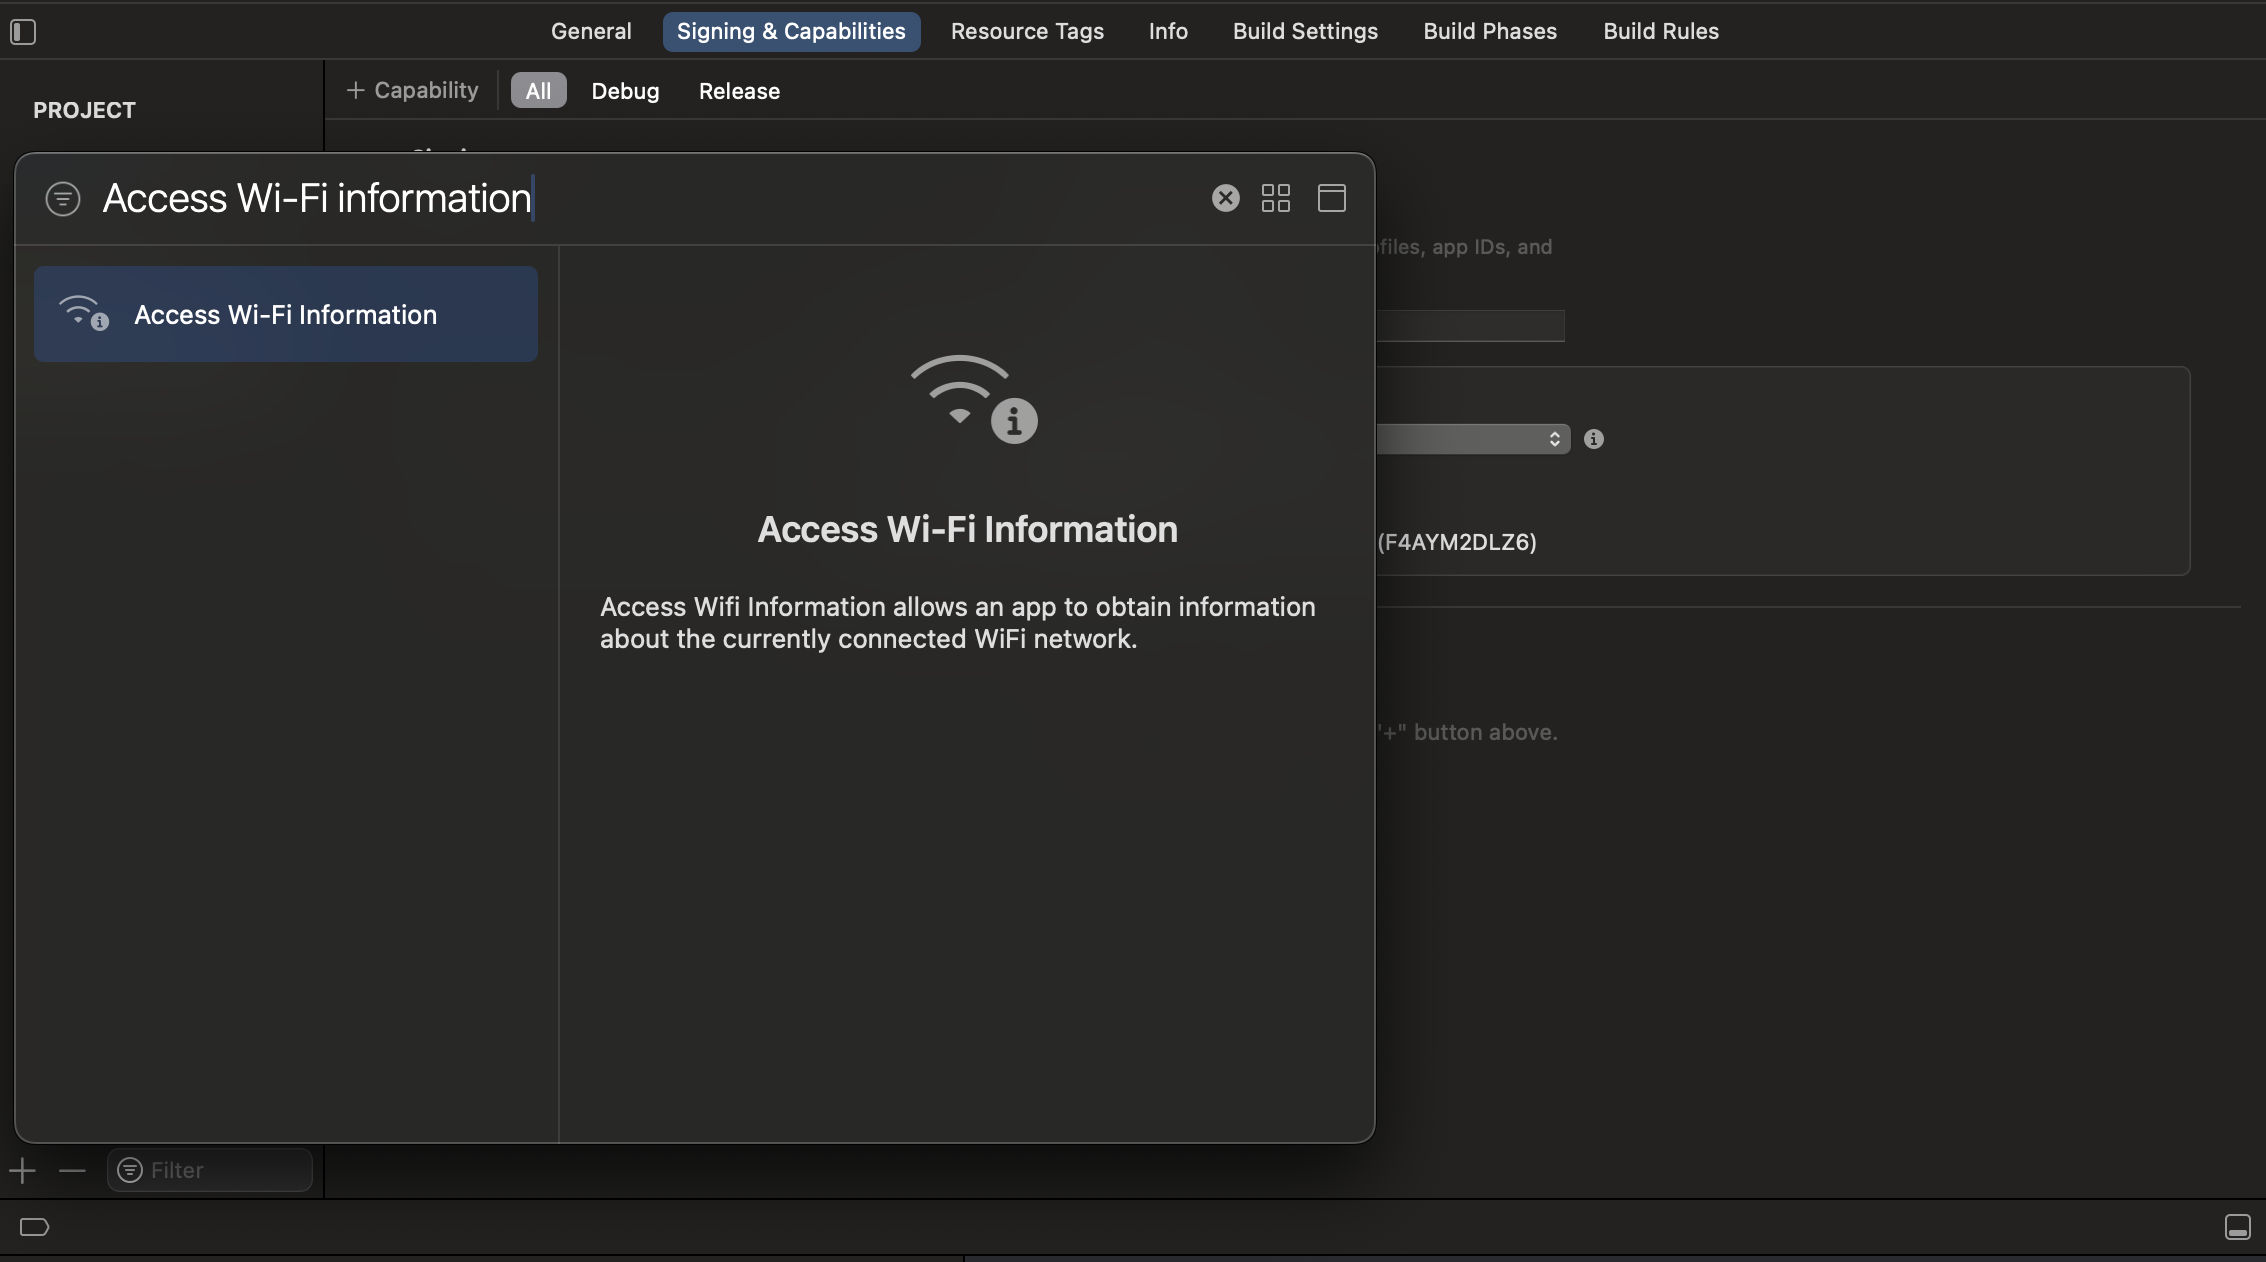
- Navigate to your project’s Target settings → Capabilities tab.
- Enable the Access WiFi Information capability to add the WiFi Entitlements to your project.

Quick Start
1. Add Dependency
- SDK is available through CocoaPods. To install it, simply add the following line to your Podfile:
# Podfile
pod 'bureau-id-fraud-sdk'

#Add below lines to end of your pod file
post_install do |installer|
  installer.pods_project.targets.each do |target|
    target.build_configurations.each do |config|
      config.build_settings['BUILD_LIBRARY_FOR_DISTRIBUTION'] = 'YES'
    end
  end
end
- "import bureau_id_fraud_sdk" in your UIViewcontroller
- Info.plist -> Add below properties
- “NSUserTrackingUsageDescription”
- “NSLocationAlwaysAndWhenInUseUsageDescription”
- “Privacy - Location When In Use Usage Description”
2. Initialise SDK
The SDK is initialized in the client app. Once the submit function is called, the data relating to the user and device is automatically synced in the background.
// Initialize BureauAPI Where ever you want AppDelegate or ViewController

BureauAPI.shared.configure(clientID: "***CLIENT ID**", environment: .production, sessionID: "*** SESSION ID ***", enableBehavioralBiometrics: false)

// clientID  -> Bureau Merchant Id
// environment -> .stage, .production, .sandbox
// sessionID -> unique String value
// enableBehavioralBiometrics -> true/false

BureauAPI.shared.setUserID("***USER ID***")

//assign the delegate where you want to get a callback response from SDK
BureauAPI.shared.fingerprintDelegate = self

BureauAPI.shared.submit() //submit device and behavior(if enabled) data to Bureau's backend using the submit function
Note
Client ID and Session ID should be mandatory and session ID should be unique for every request.
Response returned from the SDK
The DataCallback added in the Submit function returns whether the device data has been registered or not.
// Should need to extent the PrismDelegate for your View controller
extension DeviceFingerPrintVC : PrismFingerPrintDelegate{ }

// onFinished Delegate will trigger after success or failure Fingerprint SDK completion
func onFinished(data: [String : Any]?) { }

// “data” returning blow key values
// "statusCode"  -> Int? ( if statusCode == 200 or 409 “success” else “failure” )
// “apiResponse” -> NSDictionary?
3. Invoke API for Insights
To access insights from users and devices, including device fingerprint, and risk signals, integrating with Bureau's backend API for Device Intelligence insights.
Sample Request and Response
Below is a sample request and response for our Device Intelligence API. Refer to our Device Intelligence API documentation for more details.
Contact our support team at [email protected] to get your API keys and the production endpoint for the API.
curl --location --request POST 'https://api.overwatch.dev.bureau.id/v1/suppliers/device-fingerprint' \
--header 'Authorization: Basic MzNiNxxxx2ItZGU2M==' \
--header 'Content-Type: application/json' \
--data-raw '{
    "sessionKey": "697bb2d6-1111-1111-1111-548d6a809360"
}'
{
    "networkInformation": {
        "isp": "Atria Convergence Technologies Pvt. Ltd.",
        "ipType": "HOME"
    },
    "GPSLocation": {
        "city": "Madurai",
        "country": "India",
        "latitude": 9.944328308105469,
        "longitude": 78.12307672582392,
        "region": "TN"
    },
    "IP": "106.51.24.95",
    "IPType": "v4",
    "IPLocation": {
        "city": "Bengaluru",
        "country": "India",
        "latitude": 12.976229667663574,
        "longitude": 77.60328674316406,
        "region": "Karnataka"
    },
    "IPSecurity": {
        "is_crawler": false,
        "is_proxy": false,
        "is_tor": false,
        "threat_level": "LOW",
        "VPN": false
    },
    "OS": "ios",
    "debuggable": true,
    "emulator": false,
    "fingerprint": "8387e7df-320f-4b53-83c8-424ee99ea033",
    "firstSeenDays": 90,
    "mockgps": false,
    "model": "D53gAP",
    "package": "com.bureau.deviceBB",
    "jailbreak": false,
    "userId": "hariharaprabu",
    "totalUniqueUserId": 1,
    "remoteDesktop": false,
    "sessionId": "Demo-5527D044-D8CF-4DC8-9351-4A0242CBF25F",
    "createdAt": 1715231667924,
    "confidenceScore": 85.71428571428571,
    "voiceCallDetected": false,
    "riskScore": 85.57,
    "riskLevel": "VERY_HIGH",
    "riskCauses": [
        "DEBUGGER",
        "DEVELOPER_MODE",
        "NOT_INSTALLED_FROM_APP_STORE"
    ],
    "developerMode": true,
    "appStoreInstall": false,
    "fridaDetected": false,
    "accessibilityEnabled": false,
    "mitmAttackDetected": false,
    "behaviouralRiskLevel": "UNKNOWN",
    "deviceRiskScore": 85.57,
    "deviceRiskLevel": "VERY_HIGH"
}
4. Enable Local Signals (Optional)
By enabling local signals, our SDK can detect information about the end user's Apple device that could indicate potential security risks, such as:
- Mock GPS: Indicates if the device is using a simulated location instead of the actual GPS.
- Debuggable: Indicates if the app is running in debug mode, which can expose vulnerabilities.
- Jailbroken: Indicates if the device has bypassed Apple's restrictions, potentially allowing unauthorized modifications.
- VPN: Indicates if the device is on VPN or not
- Voice Call: Indicates if the device is on voice call or not
Enabling Local Signals is optional, but it can enhance your app's security.
Follow the steps below to implement the LocalSignalDelegate protocol and handle these signals in your application.
- Set the Local Signal Delegate: Assign your class as the delegate in the SDK's initialization
initfunction. This allows the SDK to communicate local signal information to your app.
BureauAPI.shared.localSignalDelegate = self
- Implement the LocalSignalDelegate Protocol: Implement the
LocalSignalDelegateprotocol in your class to handle the critical signals.
Example Implementation
Below is an example of how to implement the LocalSignalDelegate protocol in a view controller.
   extension YourViewController: LocalSignalDelegate {

     // Method to handle mock GPS signal
    func deviceLocation(isMocked: Bool) {
        if isMocked {
            print("Warning: Device location is being mocked.")
            // Add custom handling code for mocked GPS signal here
        } else {
            print("Device location is not mocked.")
        }
    }

    // Method to handle jailbroken device signal
    func device(isJailBreak: Bool) {
        if isJailBreak {
            print("Warning: Device is jailbroken.")
            // Add custom handling code for jailbroken device signal here
        } else {
            print("Device is not jailbroken.")
        }
    }

    // Method to handle app debug mode signal
    func appDebugMode(enable: Bool) {
        if enable {
            print("Warning: App is in debug mode.")
            // Add custom handling code for debug mode signal here
        } else {
            print("App is not in debug mode.")
        }
    }

     // Method to handle app VPN signal
     func isVPNEnable(enable: Bool){
        if enable {
            print("Warning: App is on VPN")
            // Add custom handling code for debug mode signal here
        } else {
            print("App is not on VPN")
        }
    }

     // Method to handle app if app on voice call
     func voiceCall(isDetected: Bool) {
        if isDetected {
            print("Warning: voice call detected.")
            // Add custom handling code for debug mode signal here
        } else {
            print("voice call not detected.")
        }
    }
}
Verifying App Integrity with Signature Hash
Before going live, we need to ensure your app hasn't been tampered with. This helps protect both you and your users.
Here's how you can verify your app's integrity:
Gather Information
- Package Name: This is the unique identifier for your app on the platform (e.g.,
com.yourcompany.myapp). It typically follows a reverse domain name structure, such as:com.<yourcompany>.<appname>com.<yourcompany>.<appname>:<servicename>(if using sub-organizations)
- Signature Hash Code: This code is generated from your app's signing certificate and helps verify its authenticity.
Get the Signature Hash Code
Most development environments provide built-in tools for obtaining the signature hash code. Below is a common way (using the GET_SIGNING_CERTIFICATES permission):
- Access your project's settings in the PackageManager.
- Look for the permission section and ensure you have the
GET_SIGNING_CERTIFICATESpermission enabled. - Once enabled, follow the specific instructions provided by your development environment to retrieve the signature hash code. It's usually found within a property like
signingInfo.signingCertificateHistoryand will be a byte array representation of the hash.
Share the Information
Once you have your package name and signature hash code, please share them with us before launching your app live. This allows us to verify the app's authenticity and protect both you and your users.
Updated 5 days ago