
Flutter SDK
Welcome to our Flutter plugin designed to seamlessly integrate with the Bureau's Device Intelligence, enhancing the functionality of mobile apps or webpages.
Minimum Requirements
- SDK Minimum Version 21
- Kotlin Minimum Version: 1.6.21
- Java Minimum Version: 8
- iOS Minimum Version: 13
- AndroidX
Flow Diagram
This diagram shows the interactions between a merchant's mobile app and Bureau's SDK.

Android Changes
- The XML below is a representation of the permissions required. Please refer to the table below.
  <uses-permission android:name="android.permission.ACCESS_NETWORK_STATE" />
  <uses-permission android:name="android.permission.USE_BIOMETRIC" />
  <uses-permission android:name="com.google.android.providers.gsf.permission.READ_GSERVICES" />
  <uses-permission android:name="android.permission.ACCESS_FINE_LOCATION" /> //OPTIONAL
  <uses-permission android:name="android.permission.ACCESS_COARSE_LOCATION" />
  <uses-permission android:name="android.permission.ACCESS_WIFI_STATE" />
  <uses-permission android:name="android.permission.ACCESS_NETWORK_STATE" />
  <uses-feature android:name="android.hardware.location.gps" />
  <uses-feature android:name="android.hardware.location" />
| Permission | Usage Status |
|---|---|
| USE_BIOMETRIC | REQUIRED |
| READ_GSERVICES | REQUIRED |
| ACCESS_WIFI_STATE | REQUIRED |
| ACCESS_NETWORK_STATE | REQUIRED |
| ACCESS_COARSE_LOCATION | REQUIRED |
| ACCESS_FINE_LOCATION | OPTIONAL |
- Create a custom application class extending from
FlutterApplicationclass inandroidfolder inidfolder insideappmodule. - Add the following lines of code in the outer
build.gradlein theappmodule.
buildscript {
  repositories {
    maven {
      url = uri("https://storage.googleapis.com/r8-releases/raw")
    }
  }
  dependencies {
    classpath("com.android.tools:r8:8.2.24")
  }
}
- Add maven dependency in
settings.gradleor in the outerbuild.gradlebased on your gradle version. An example of this is shown below.
repositories {
        google()
        mavenCentral()
        maven { url "https://packages.bureau.id/api/packages/Bureau/maven" } // add this line
 }
- Add bureau dependency in the outer
build.gradleas shown below.
dependencies {
    implementation 'id.bureau:behavioralbiometricsanddeviceintel:2.3.10'
}
- Implement
BehavioralBiometricsHelperin the custom application class. Initialize and providebureauApias shown below.sessionId- MANDATORYcredentialId- MANDATORYenvironment- MANDATORY - default is productionapplicationInstance- MANDATORY - java class application
package id.bureau.onetaplogin_example;

import android.util.Log;

import androidx.annotation.NonNull;

import com.bureau.behavioralbiometricsanddevicefingerprint.BehavioralBiometricsBureauApi;
import com.bureau.behavioralbiometricsanddevicefingerprint.BehavioralBiometricsHelper;
import com.bureau.base.Environment;

import java.util.UUID;

import io.flutter.app.FlutterApplication;

public class BureauApplication : FlutterApplication, BehavioralBiometricsHelper {

    val bureauAPI: BehavioralBiometricsBureauApi? = null;
    val sessionId = UUID.randomUUID().toString();

    override fun onCreate() {
        super.onCreate();
        bureauAPI =  BehavioralBiometricsBureauApi.init(
                this,
                credentialId,
                sessionId,
                Environment.ENV_PRODUCTION,
        );
    }

    override fun getBehavioralBiometricsBureauApi(): BehavioralBiometricsBureauApi {
        return bureauAPI;
    }

    override fun getSessionId(): String {
        return sessionId;
    }
}
package id.bureau.onetaplogin_example;

import android.util.Log;

import androidx.annotation.NonNull;

import com.bureau.base.Environment;
import com.bureau.behavioralbiometricsanddevicefingerprint.BehavioralBiometricsBureauApi;
import com.bureau.behavioralbiometricsanddevicefingerprint.BehavioralBiometricsHelper;

import java.util.UUID;

import io.flutter.app.FlutterApplication;

public class BureauApplication extends FlutterApplication implements BehavioralBiometricsHelper {

    private BehavioralBiometricsBureauApi bureauAPI = null;
    private final String sessionId = UUID.randomUUID().toString();

    @Override
    public void onCreate() {
        super.onCreate();
        bureauAPI =  BehavioralBiometricsBureauApi.Companion.init(
                this,
                credentialId,
                sessionId,
                Environment.ENV_PRODUCTION
        );
    }

    @NonNull
    @Override
    public BehavioralBiometricsBureauApi getBehavioralBiometricsBureauApi() {
        return bureauAPI;
    }

    @NonNull
    @Override
    public String getSessionId() {
        return sessionId;
    }
}
iOS Changes
Make the below changes to Info.plist
//App would like to access IDFA for tracking purpose
<key>NSUserTrackingUsageDescription</key>
<string></string>
POD File Changes
//Add below lines to end of your pod file.
post_install do |installer|
  installer.pods_project.targets.each do |target|
    target.build_configurations.each do |config|
      if target.name == "Sentry" || target.name == "SwiftProtobuf" then
        config.build_settings["BUILD_LIBRARY_FOR_DISTRIBUTION"] = 'YES'
      end
    end
  end
end
AppDelegate File Changes
import bureau_id_fraud_sdk
...
...

// Extend BehavioralBiometricsHelper
@objc class AppDelegate: FlutterAppDelegate, BehavioralBiometricsHelper {
 ..
 ..
val sessionId = UUID.randomUUID().toString();

override func application(
    _ application: UIApplication,
    didFinishLaunchingWithOptions launchOptions: [UIApplication.LaunchOptionsKey: Any]?
  ) -> Bool {
   GeneratedPluginRegistrant.register(with: self)

	..
  // Initialize the Bureau SDK
      //1. sessionId - MANDATORY
			//2. credentialId - MANDATORY
   		//3. environment - MANDATORY - default is production
   		//4. enableBehavioralBiometrics - true
    BureauAPI.shared.configure(clientID: "**CLIENT ID**", environment: .production, sessionID: sessionId, enableBehavioralBiometrics: true)

    return super.application(application, didFinishLaunchingWithOptions: launchOptions)

  }

  func getSessionId() -> String {
     return sessionId
  }

}
Integration Steps in Flutter code
- Call
startSubSessionmethod where you want to start collecting behavioral data with uniquesubsessionIdas the parameter. - Replace all
TextFieldwithBureauTextFieldprovided by SDK to collect behavioral information. - Call
stopSubSessionmethod where you want to stop collecting behavioral data. - Invoke the
submitDeviceIntelligenceWithBehavioralBiometricsfunction with theuserId(MANDATORY) parameter to pass the data to Bureau backend. - Upon successful submission of the parameters, a
callbackis received in the SDK. The next steps can be taken based on thecallback(success/failure). - If the callback is successful, your mobile application relays the
successto your backend - Invoke Bureau's backend API
/v1/suppliers/device-fingerprintto fetch insights- Input:
sessionId
- Input:
- Based on the insights provided (fingerprint, risk signals, behavioral insights), you can determine the next steps for the user, such as allowing, blocking, or redirecting them.
Step 1 - SDK Installation
| Version | Recommendation |
|---|---|
| Install onetaplogin: 1.3.8 | Use this version if you DO NOT want to collect package names via "QUERY_ALL_PACKAGES" for fraud signal detection. |
Step 2 - SDK usage
// Import package
import 'package:onetaplogin/onetaplogin.dart';


Onetaplogin.startSubSession(const Uuid().v1());
Onetaplogin.stopSubSession();
String status = await Onetaplogin.submitDeviceIntelligenceWithBehavioralBiometrics(userId);
The status object for submitDeviceIntelligenceWithBehavioralBiometrics would be a Bureau's custom class with the following properties:
isSuccess- boolean - to check the success ofdeviceintelligence.errorMessageanderrorCode: to pinpoint errors in the caseisSuccessisfalseandemptyfortruecases.
Step 3 - Invoke API for Insights
To access insights from users and devices, including device fingerprint, and risk signals, integrating with Bureau's backend API for Device Intelligence insights.
Sample Request and Response
Below is a sample request and response for our Device Intelligence API. Refer to our Device Intelligence API documentation for more details.
Contact our support team at [email protected] to get your API keys and the production endpoint for the API.
curl --location --request POST 'https://api.sandbox.bureau.id/v1/suppliers/device-fingerprint' \
--header 'Authorization: Basic MzNiNxxxx2ItZGU2M==' \
--header 'Content-Type: application/json' \
--data-raw '{
    "sessionId": "697bb2d6-1111-1111-1111-548d6a809360"
}'
{
  "GPSLocation": {
    "city": "",
    "country": "",
    "latitude": 0,
    "longitude": 0,
    "region": ""
  },
  "IP": "106.51.82.180",
  "IPLocation": {
    "city": "Bengaluru",
    "country": "India",
    "latitude": 12.976229667663574,
    "longitude": 77.60328674316406,
    "region": "Karnataka"
  },
  "IPSecurity": {
    "VPN": false,
    "isCrawler": false,
    "isProxy": false,
    "isTor": false,
    "threatLevel": "LOW"
  },
  "IPType": "v4",
  "OS": "android",
  "accessibilityEnabled": false,
  "adbEnabled": false,
  "behaviouralRiskLevel": "UNKNOWN",
  "confidenceScore": 100,
  "createdAt": 1712573578096,
  "debuggable": false,
  "developerMode": false,
  "deviceRiskLevel": "MEDIUM",
  "deviceRiskScore": 25.56,
  "emulator": false,
  "factoryResetRisk": "LOW",
  "factoryResetTime": null,
  "fingerprint": "6db7755c-1232-4f9d-ae1e-52bd952fac68",
  "firstSeenDays": 9,
  "googlePlayStoreInstall": true,
  "isAppCloned": true,
  "isAppTampered": null,
  "isDebuggingEnabled": false,
  "isOEMUnlockAllowed": false,
  "isSimPresent": true,
  "merchantId": "org_4KRtr8n6xKTsONjo",
  "mitmAttackDetected": false,
  "mockgps": false,
  "model": "A063",
  "networkInformation": {
    "ipType": "HOME",
    "isp": "Atria Convergence Technologies Pvt. Ltd."
  },
  "package": "id.bureau.sdkdemo",
  "remoteDesktop": false,
  "requestId": "26de630a-c4c2-451f-8718-b7df6a1f786b",
  "riskCauses": [
    "IS_APP_CLONED"
  ],
  "riskLevel": "MEDIUM",
  "riskScore": 25.56,
  "rooted": false,
  "sessionId": "3ad55d53-08be-46d5-8103-a8d0b570d6f5",
  "statusCode": 200,
  "timestamp": 1713427153595,
  "totalUniqueUserId": 5,
  "userId": "dhruvMultiple",
  "voiceCallDetected": false
}
Error Codes
The table below lists a few error codes returned by Bureau's SDKs.
| HTTP Error Code | Description | Possible Cause | Recommended Action |
|---|---|---|---|
| 420 | HTTP exception | Indicates a server-side issue. This can include errors such as: - Rate limiting, server overload, or application error - Firewall or network restrictions - Server-side scripting errors - Third-party services | - Check your server logs to help identify the cause. - Implement rate limiting or load balancing if necessary. - Check firewall rules and network settings to ensure they are not interfering with the connection. - Inspect server logs for any specific error messages or warnings. - Contact the service provider for assistance or look for alternative solutions. |
| 421 | Network error | - Too many connections from a single IP address - DNS resolution issues - Load balancer issues - Client-side issues (browser extensions, network configurations) | - Reduce the number of simultaneous connections. Consider using a load balancer. - Try flushing your DNS cache or using a different DNS server. - Check the load balancer's status and logs for any problems. - Try disabling extensions or using a different network connection. |
| 432 | A general, unexpected exception or error occurred. | Various reasons such as: - Programming errors - Unexpected input - System failures | 1. Review the code for potential errors or logic issues. 2. Check if the input data is valid and meets the expected format. 3. If the error persists, check our SDK documentation or our contact Support Team. |
| 433 | The required session ID is missing or empty. | The session ID was not provided or was not passed correctly. | 1. Ensure that the session ID is included in the API request and is not empty. 2. Refer to the API documentation for the correct format and usage of the session ID. |
| 434 | The eaIV or eaKey is empty. These are essential for decrypting encrypted data. | The required encryption parameters, eaIV (Initialization Vector) and eaKey (Encryption Key) are missing or invalid. | - Verify that the eaIV and eaKey are provided and correct. - Ensure they are generated using a secure method and are not compromised. |
Verifying App Integrity with Signature Hash
Before going live, we must ensure your app hasn't been tampered with. This helps protect both you and your users.
Here's how you can verify your app's integrity:
Gather Information
- Package Name: This is the unique identifier for your app on the platform (e.g.,
com.yourcompany.myapp). It typically follows a reverse domain name structure, such as:com.<yourcompany>.<appname>com.<yourcompany>.<appname>:<servicename>(if using sub-organizations)
- Signature Hash Code: This code is generated from your app's signing certificate and helps verify its authenticity.
Get the Signature Hash Code
Most development environments provide built-in tools for obtaining the signature hash code. Below is a common way (using the GET_SIGNING_CERTIFICATES permission):
- Access your project's settings in the PackageManager.
- Look for the permission section and ensure you have the
GET_SIGNING_CERTIFICATESpermission enabled. - Once enabled, follow the specific instructions provided by your development environment to retrieve the signature hash code. It's usually found within a property like
signingInfo.signingCertificateHistoryand will be a byte array representation of the hash.
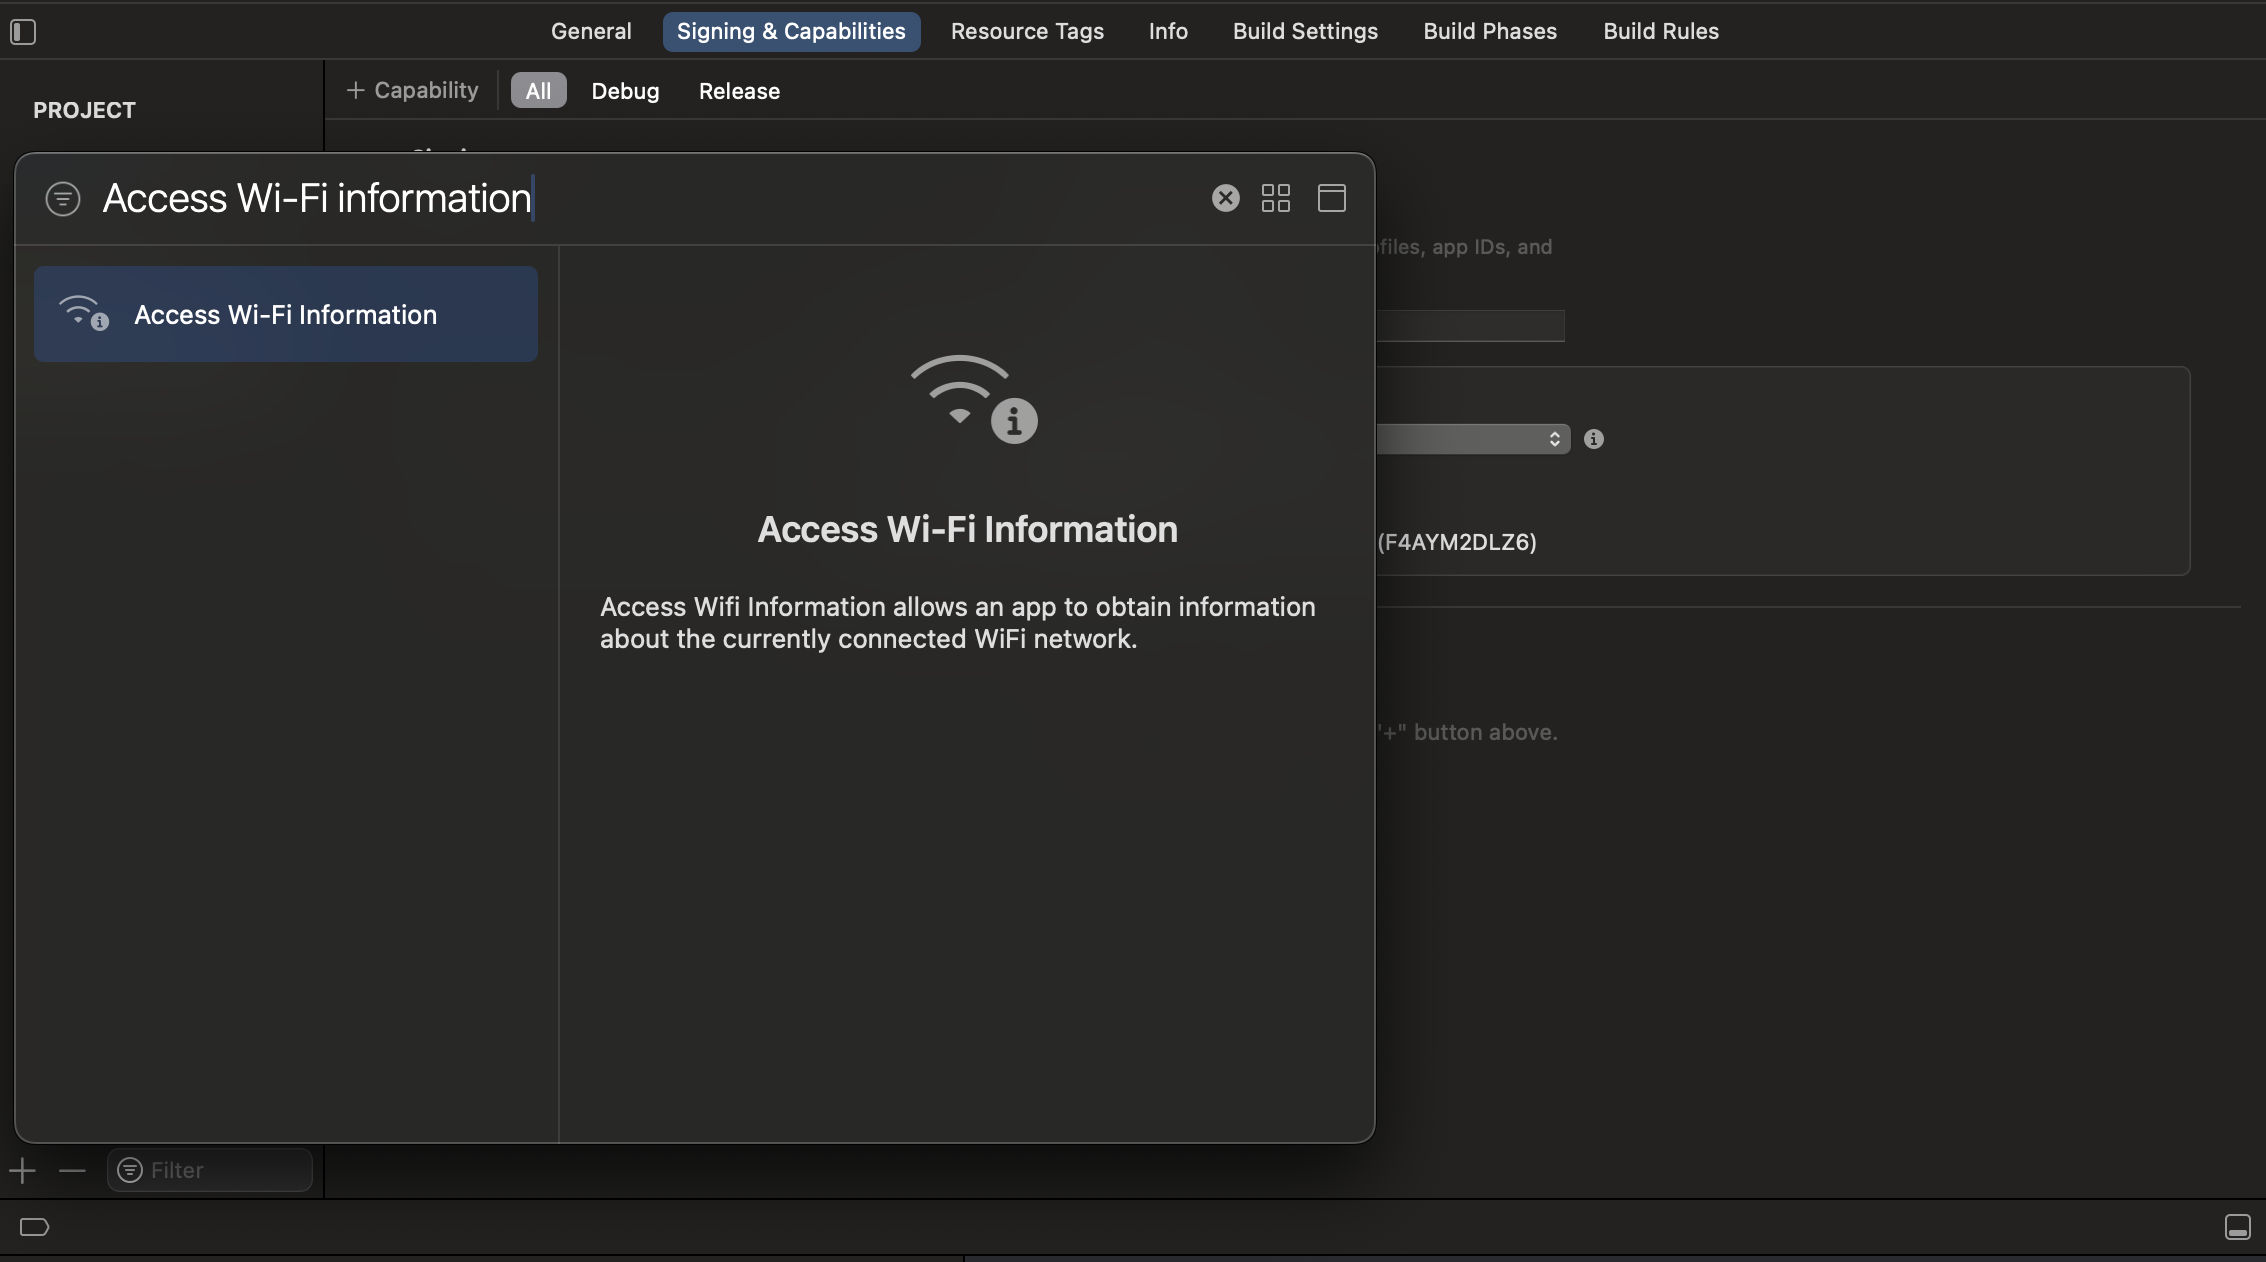
Prerequisite iOS (Optional)
Enable the WiFi Information
Before integrating our SDK into your application, it’s essential to enable Access to WiFi Entitlements in your Apple Developer Account. This entitlement is necessary for our SDK to retrieve information about the connected WiFi network.
Please follow the steps below to enable Access to WiFi Entitlements.
- Log into your Apple developer account.
- Navigate to the Certificates, Identifiers & Profiles section.
- Select your app and enable the Access WiFi Information entitlement. The Access WiFi Information entitlement is available in the Identifiers section.
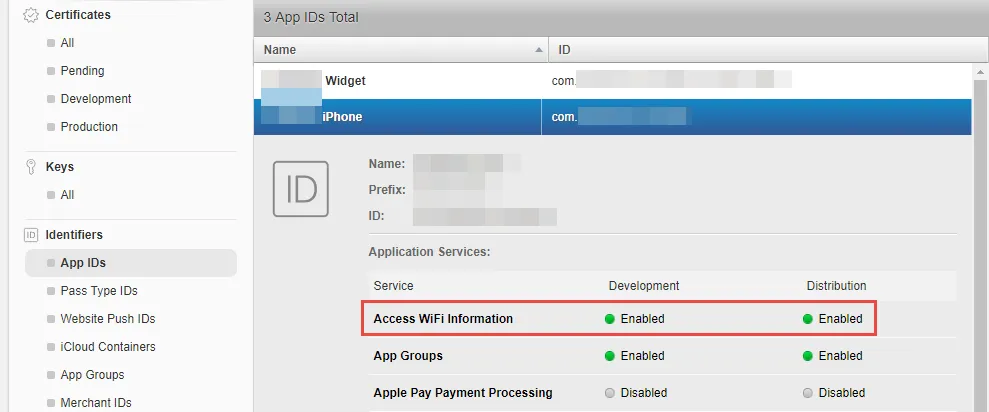
- Navigate to Provisioning Profiles and regenerate them, as existing profiles will become invalid after the entitlement change.
- Open Xcode, go to Preferences (⌘ + ,) → Accounts. Select your team and click Download Manual Profiles to fetch the latest profiles.
- Navigate to your project’s Target settings → Capabilities tab.
- Enable the Access WiFi Information capability to add the WiFi Entitlements to your project.
Share the Information
Once you have your package name and signature hash code, please share them with us before launching your app live. This allows us to verify the app's authenticity and protect both you and your users.
Updated 10 days ago