iOS SDK
This SDK has the capabilities related to device intelligence and OTL
Minimum Requirements
- Xcode 11.0+
- iOS Deployment Target > 13.0
Integration Steps
At its core, the solution functions through three straightforward steps:
- Start by implementing OTL SDK with mobile application.
- Initialize the SDK using either the Client ID or Credential ID and call
makeauthcall()method. This enables us to make initiate api call. - You can then utilize our API to access user insights, aiding you in deciding the subsequent actions for your user.
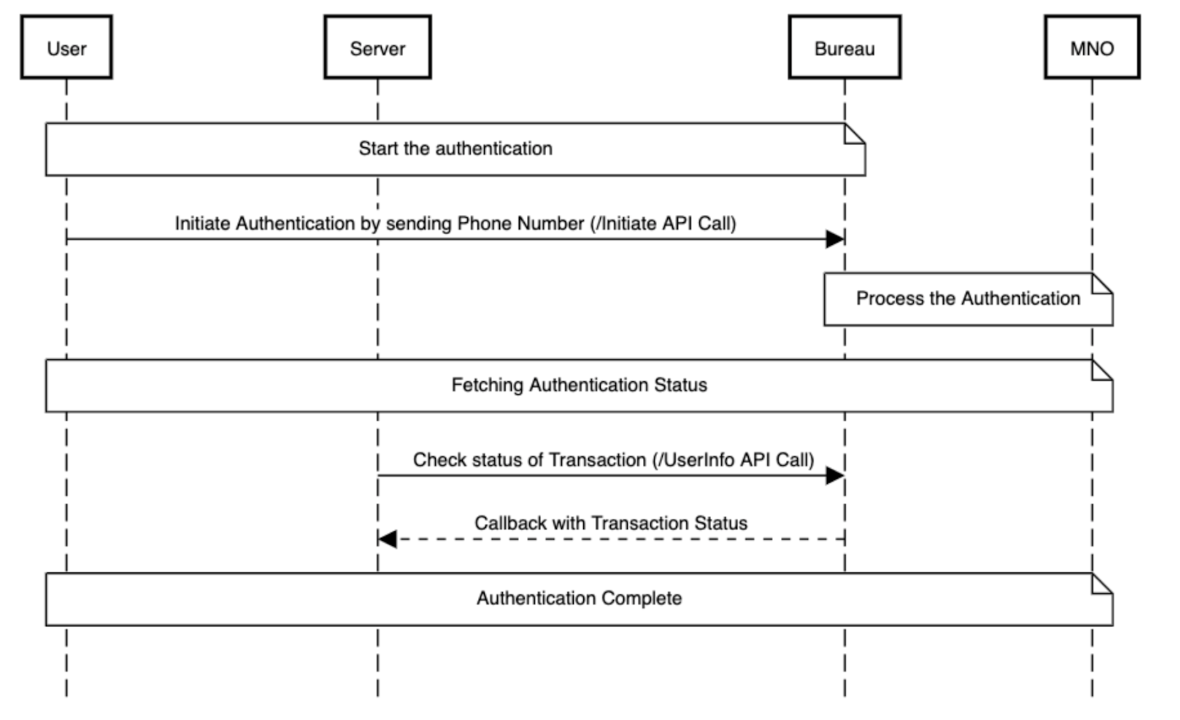
Flow Diagram
This diagram shows the interactions between a merchant's mobile app and Bureau's SDK.

sessionIdis generated by the client backend and sent to the SDK.phoneNumberis entered by the user- Initialise the SDK and invoke the authenticate function in SDK to make the initiate api call.
- Upon successful submission of the parameters, a callback is received in the SDK. The next steps can be taken based on the callback (success/failure).
- If the callback is successful, Invoke the Bureau's backend API
v2/auth/userinfoto fetch user info for OTL. - Based on the user info, you can determine to login or send OTP as SMS in case of failure.
Step 1: Add the SDK to Your Project
- Drag and drop the
bureauauth.xcframeworkinto your Xcode project. - Verify that the
bureauauth.xcframeworkis included under “Frameworks, Libraries, and Embedded Content” (under your project’s target settings). - Ensure that the “Embed & Sign” option is selected for the framework.
Step 2: Import Bureau Authentication
In the class where you intend to use the Bureau SDK, import the bureauauthentication module.
import bureauauthentication
Step 3: Configure info.plist
info.plistOpen and add the below code to the info.plist file.
<key>NSAppTransportSecurity</key>
	<dict>
		<key>NSAllowsArbitraryLoads</key>
		<true/>
		<key>NSExceptionDomains</key>
		<dict>
			<key>mcext.zumigo.com</key>
			<dict>
				<key>NSExceptionAllowsInsecureHTTPLoads</key>
				<true/>
				<key>NSIncludesSubdomains</key>
				<true/>
			</dict>
			<key>passport.airtel.in</key>
			<dict>
				<key>NSExceptionAllowsInsecureHTTPLoads</key>
				<true/>
				<key>NSIncludesSubdomains</key>
				<true/>
			</dict>
			<key>partnerapi.jio.com</key>
			<dict>
                		<key>NSExceptionAllowsInsecureHTTPLoads</key>
                		<true/>
                		<key>NSIncludesSubdomains</key>
                		<true/>
            		</dict>
		</dict>
	</dict>
Step 4: Initialize SDK
Create an instance of the Bureau SDK using the below builder pattern.
let bureauObj = BureauAuth.Builder()
          .setClientId(clientId: "<client ID>")
          .build()

     //Other Options in builder are
        //setTimeout - total timeout in seconds
        //setCallBackUrl
        //mode - sandbox and production
You can customize other options in the builder, such as setting a timeout, callback URL, or choosing between sandbox and production mode.
Note
- To initialise the SDK we need to provide
client ID.- The default environment is production. If you want to run on UAT pass ENV_SANDBOX
Step 5: Usage
Make an authentication call using the makeauthcall method.
let response = bureauobj.makeauthcall(mobile: "", correlationID: "")
if response {
    // Proceed with waiting for the callback from Bureau servers or poll the userinfo API
}
Note
- If the
makeAuthCall()method returnsTrueyou can go ahead and wait for the callback from Bureau servers or poll the User Info API.mobile: This is the number you want to verify.correlationIdis mandatory and unique for each authentication.
Step 6: Poll User Info API
To access insights from users for OTL, integrating with Bureau's backend API is a must for both OTL.
Please find below the link to the respective API documentation:
OTL: https://docs.bureau.id/reference/one-tap-login
- Sandbox - https://api.sandbox.bureau.id/v2/auth
- Production - https://api.bureau.id/v2/auth
Authentication
API's are authenticated via a clientID and secret, they have to be base64 encoded and sent in the header with the parameter name as Authorisation.
Authorisation : Base64(clientID:secret)
curl --location --request GET 'https://api.sandbox.bureau.id/v2/auth/userinfo?transactionId=E1DA15EB-1111-1111-A9FA-2F1F65A9D046' \
--header 'Authorization: Basic MzNjMDBg0YzZWM3NTI1OWNiOA=='
curl --location --request GET 'https://api.bureau.id/v2/auth/userinfo?transactionId=E1DA15EB-1111-1111-A9FA-2F1F65A9D046' \
--header 'Authorization: Basic MzNjMDBg0YzZWM3NTI1OWNiOA=='
API Response
Bureau's Backend API will return one of the following HTTP status codes for every request:
{
  "mobileNumber": "919932403339",
  "country_code": "IN",
  "status": "Success",
  "authenticatedAt": "1704364405"
}
{
    "statusCode": 400,
    "error": {
        "code": 0,
        "type": "BAD_REQUEST",
        "message": "Session key is missing",
        "description": "request does not contain additionalData.sessionKey param in request",
        "referenceId": "24f94ae8-xxxx-48a4-xxxx-b25f99fb06d9",
        "metadata": null
    },
    "timestamp": 1658402143450,
    "merchantId": "auth0|61dfbbxxxx3420071be7021",
    "requestId": "66403193-xxxx-44bc-xxxx-14735a45dfeb"
}
{
  "data": null,
  "errors": {
    "status": 401,
    "errorCode": "UNAUTHORIZED",
    "service": "Overwatch"
  },
  "message": "",
  "meta": {
    "length": 0,
    "took": 0,
    "total": 0
  }
}
{
    "error": {
        "code": 422,
        "description": "Failed to find fingerprint for given session key",
        "message": "NO_RECORD_FOUND",
        "metadata": null,
        "referenceId": "",
        "type": "NO_RECORD_FOUND"
    },
    "merchantId": "auth0|61dfbbxxxx420071be7021",
    "requestId": "24e1aa7f-xxxx-404d-xxxx-5f8a0227e8f0",
    "statusCode": 422,
    "timestamp": 1658402132141
}
{
  "error": {
    "code": 0,
    "description": "",
    "message": "Server encountered an error",
    "metadata": null,
    "referenceId": "86529a18-a5cb-4da9-91b0-8d04cdb9167e",
    "type": "INTERNAL_SERVER_ERROR"
  },
  "merchantId": "auth0|61dfxxxx0071be7021",
  "requestId": "c69d86f0-xxxx-4ef0-xxxx-e687d595a507",
  "statusCode": 500,
  "timestamp": 1657009043753
}
Updated 10 days ago