
Liveness Web SDK
Learn how to integrate Bureau's Liveness Web SDK in your application and how to extract the results for further processing.
Bureau’s Liveness Web SDK is designed to help you verify the authenticity of a user before onboarding them. The user interface guides users through the photo capture process. Once the image is captured, our advanced system analyzes it to ensure it is a selfie, confirms the presence of a face, and verifies that the image does not contain multiple faces.
Our SDK further analyzes the image and provides insights such as whether the face is covered or contains accessories, if the individual’s eyes are open, and if the image is black and white. Our SDK also evaluates image quality and informs you if the image contains unsuitable elements.
Using all this information, our SDK computes a liveness score that you can use to make informed decisions according to your business needs.
This document walks you through integrating Bureau’s Liveness Web SDK into your web application.
Demo Application
You can try our Liveness Web SDK using our demo application.
Technical Specifications
SDK Size
The GZip version of SDK is around 392KB.
Typescript Support
The SDK offers official support for TypeScript, providing typings for the below essential functionalities:
- init() method
Browser Compatibility
The table below lists the web browsers with which our Liveness Web SDK is compatible.
| Browser | Compatibility |
|---|---|
| Chrome | ✅ |
| Firefox | ✅ |
| Safari | ✅ |
| Chrome (M-Web, Android) | ✅ |
| Firefox (M-Web, Android) | ✅ |
| Safari (macOS) | ✅ |
Prerequisite
Before integrating our Liveness Web SDK in your application, you need to obtain your API keys. There are 2 ways to get API keys:
- Generate API keys from the Bureau Dashboard.
- Contact our Support Team at [email protected].
Your API keys consist of YOUR_CREDENTIAL_ID and YOUR_CREDENTIAL_SECRET. You will need YOUR_CREDENTIAL_ID to initialize the SDK.
Integration
Note
Our Liveness Web SDK cannot be run from a local server. To run our Liveness SDK, you must run the HTML file from a hosted server.
Here is a simple guide to run the HTML files using Node.js.
The figure below gives an overview of the steps you need to complete to integrate our Liveness Web SDK into your web application.
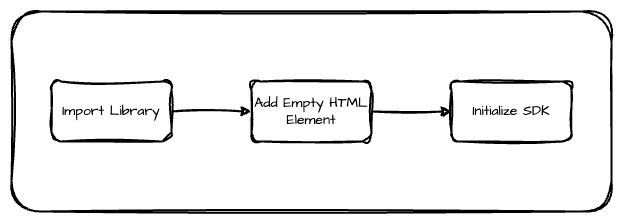
1. Import the library
Add the below line of code within <body> tags in your HTML script to import our Liveness Web SDK library into your application.
<script src="<https://liveness.app.bureau.id/static/js/main.js"></script>
<script src="<https://liveness.app.stg.bureau.id/static/js/main.js"></script>
2. Add Empty HTML Element
Add the below line of code within <body> tags in your HTML script. The SDK interface is rendered in this interface.
<div id="bureau-mount"></div>
3. Initialize the SDK
Add the below lines of code within <html> tags after the <body> tags in your HTML script. This initializes the SDK.
window.BureauFacelivenessSDK.init({
  clientId: '<YOUR_CREDENTIAL_ID>', //Obtained when generating your API keys
  container: 'bureau-mount',
  redirectURL: '<redirection URL>'
});
Parameters
The table below lists the parameters required to initialize the SDK and gives a brief description of each of them.
| Parameter | Format | Notes |
|---|---|---|
| clientID (Mandatory) | string | This is YOUR_CREDENTIAL_ID obtained when generating your API keys. |
| container (Mandatory) | string | Must be an empty element. Container element Id where you want to render the SDK. |
| redirectURL (Mandatory) | string | Liveness verification results are appended to the redirect URL you provide. URL to which you want to redirect users after the operation is successful. |
Sample Integration Code
Below is sample code to launch our Liveness Web SDK from your project. Add the below code to the .html file in your project and run the file from your server to see our Liveness SDK in action.
Note
Our Liveness Web SDK cannot be run from a local server. To run our Liveness SDK, you must run the HTML file from a hosted server.
Here is a simple guide to run the HTML files using Node.js.
<!DOCTYPE html>
<html lang="en">
  <head>
    <meta charset="utf-8" />
    <title>Face Liveness SDK Integration</title>
  </head>
  <body>
    <noscript>
      You need to enable JavaScript to run this app. Please [enable JavaScript](https://www.enablejavascript.com/) to continue.
    </noscript>
    <div id="root">
      <div id="bureau-mount"></div>
    </div>
  </body>
  <script src="https://liveness.app.bureau.id/static/js/main.js"></script>
  <script>
    window.BureauFacelivenessSDK.init({
      clientId: "<YOUR_CREDENTIAL_ID>", // Replace this with your credential Id. You get this when you generate your API keys.
      container: "bureau-mount",
      redirectURL: "<Redirect URL>" // Replace this with the URL to which you want to redirect users after the SDK completes its operations.
    })
    .then(() => {
      console.log("Liveness SDK initialized successfully!"); // Example success handling
    })
    .catch(error => {
      console.error("Error initializing Liveness SDK:", error); // Example error handling
    });
  </script>
</html>
Extract Results
Our SDK appends liveness results and the captured image to the redirect URL as query parameters. You can extract information from this URL for further processing as per your business requirements.
The below video shows you how to extract the liveness results and the captured image after verifying the liveness of an individual using Bureau's Liveness Web SDK.
Redirect URL With Results Appended
Let's say the SDK redirects the end users to https://www.google.com/. Below is how the redirect URL would look with the appended results.
https://www.google.com/?result=%7B%22faces%22%3A%7B%22accessories%22%3A%7B%22clothing%22%3A0%2C%22glasses%22%3A0%2C%22headgear%22%3A0%2C%22hijab%22%3A0%2C%22mask%22%3A0%7D%2C%22eyesOpen%22%3Atrue%2C%22multipleFacesDetected%22%3Afalse%7D%2C%22liveness%22%3A%7B%22live%22%3Atrue%2C%22livenessScore%22%3A99.999%7D%2C%22moderation%22%3A%7B%22blackAndWhite%22%3Afalse%2C%22gore%22%3Afalse%2C%22nudity%22%3Afalse%2C%22poorQuality%22%3Afalse%2C%22skinOrChest%22%3A0%2C%22whiteBackground%22%3Afalse%7D%7D&livenessURL=https://orch-stg-mb-s3-documents-objects.s3.ap-south-1.amazonaws.com/232be663-eb00-40da-bed0-0440ead30496.jpeg?X-Amz-Algorithm=AWS4-HMAC-SHA256&X-Amz-Credential=ASIATACDUOEMX7AGGY2D%2F20240910%2Fap-south-1%2Fs3%2Faws4_request&X-Amz-Date=20240910T114042Z&X-Amz-Expires=300&X-Amz-Security-Token=IQoJb3JpZ2luX2VjRKO305369619dXRoLTEiRjBEAiA8j%2FPtsQJsWOF0KczQZRgVFU%2FFxXdHohh1pyG5Dv87OQIgc7gK4RyxLHYPTqkC8P7VrICXUJHKPO3RzN4L%2BOy5N38qggQIdBABGgwyMDYzMDAyNzkwNjUiDAoS8JdXNjq%2BRKO305369619bd6Y7feYX5%2BM6G2EWaAHhVhEDOo49DbwIwZ3C8TjgeCO0uAeSb3pLwMUejv9QgOQDi3XF7TiJZIFw9BteEzsHxbMT3Gkt63r74qL7FY7x%2B%2BSvdED6DhHEYdIquZuTPXhzu22d59PCF0UhTDkqpnT0AYVCWJUw0H8xVnZEzM9AJdGJxChHSjqSrx%2FNlVmoC%2FwPFhg3wK%2FYvIH6sxibAcihq7J8iT2ruRy6wrLjpHN2qeRKO305369619WZV1GTPeV5Sd7eys1W3ct6FpnTZV0lMvQHzN85VArhP8RDB1MxsNvSNR9hDem1cWZxjk5Qh%2F1hzKoybE2Cjr2Q%2B1Ci4ztq8Y3IRjwfXfJteZXBi1t6wTJ0MsU2zQlNlMTGmEbeKxvvBsfHmm3ZvDiNCxOsSzhwdbM21G4iCQx16o6Op6H4sSIyzdgoSfwOo%2BvwnVjnma%2FmzdCeRxKLp23XL0GmhyTttV6ZOgB%2FoORQBvUc0lwzZkMtM1KQt59HfQyKeNM6DmeotwbrraG5CS6UVxCYhYgVI5ZLLszH%2BcMZPEduz13F8AfroDogQO6tovQkP9NEqnJcxSm0ClhHOOa63xKmPQGN5Wu1ACXGKT3GL2vFByXqWkoiwWOlOkqLMfVs4noMIDCgLcGOqYBfm8%2Briuzdao2qUB1RV8qgGPAIpPPKEAocZSwtQhDxft8ikPjDdJ9%2BV%2FDRa0reRmxPXxTXGeOkOcIcz5xik28AfroDogHkikuE9wlLLgFDJ1%2BchH9ifmN3zfVvcMkrOoQuApDiJpUusghRN9Z7iLU4FaHKFYaX%2Bh7tAfroDogrgl9CiuV3tSVt%2BiaMKr8p18riREu%2B1Z0OnoQLVCoAJylerbONeOzug%3D%3D&X-Amz-SignedHeaders=host&X-Amz-Signature=5b762e01427b7d9fdc07f4cdf13401b96e893cdcd7f43d74c56632ad902261eb
Extract Liveness Results
To extract liveness results:
- Listening to the redirect/results event.
- Extracting and storing the redirect URL.
- Parsing the URL to extract the information associated with the
resultquery parameter. - Convert the extracted information to the required format (for example, JSON).
Extract Captured Image
To extract the captured image:
- Listening to the redirect/results event.
- Extracting and storing the redirect URL.
- Copy everything after
livenessURL=in the redirect URL. This is the URL for the captured image. - Use this to download the captured image. The captured image URL is valid for 5 minutes.
Image URL Expiry
We store the captured image only for 5 minutes. If you want to extract the captured image, you must extract it within 5 minutes.
The image URL will not be valid after 5 minutes.
Updated 5 days ago